Despite having a bit of a play with Apple Aperture I have found myself returning to iPhoto again and again. Perhaps it is the way it easily integrates with iLife and iWork or the fact the photo books offer more option who knows but I use it on more or less a daily basis.
The workflow tends not to change regardless of the type of photos being taken. iPhoto is great for the home user with dozens of holiday or family photos. Grouping photos by events is brilliant and the face recognition function is growing in its usefulness as it learns the faces in my photos.
My five step workflow is relatively simple. Most of the photos I end up sharing with the world end up on Flickr. Some family photos are shared via MobileMe with other family members, both sharing methods are effortless.
1. Crop
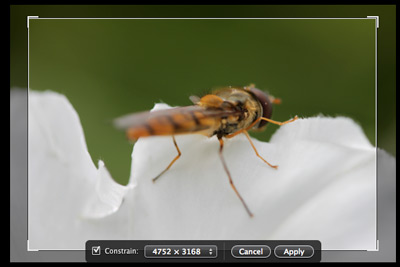
Generally no photo is perfectly framed more often than not I have stray artifacts that have to be removed before a photo is even close to being presentable. Cropping in iPhoto is easy (click the edit button to reveal the full range of editing functions available. The crop function can also be restricted to the popular photo sizes. Drag the cropping frame over the area you want to be the final masterpiece, hit enter and you are done.

2. Retouch
The retouch tool is possible the most useful tool I have come across in any photo application. Click on a blemish and it is gone. The tool is particularly useful for family photographs if children have the remains of their lunch on their face although in this photo I was able to remove tiny grains of sand on the insect in a few seconds. Keep the retouch circle as small as you can (obviously slightly larger than the blemish, click and it is gone.

3. Enhance
Hidden under the bonnet of the iPhoto interface is a pretty sophisticated ehanced control panel. Click the ‘Adjust’ button to reveal the advanced control. You can see from the screen shot I have just tweaked the image slightly increasing the saturation and tint a little.
Too much adjustment can make a photo look completely fake but a bit of a tweak can transform a photo. Remember if you feel iPhoto doesn’t offer enough editing power you can set your editing to be performed by an external application (such as Photoshop) in the iPhoto Preferences.

4. Tag
It can be a bit of a pain at the time but tagging your photos can make life alot easier later on. I tend to use a maximum of three tags per photo, Macro, Insect etc. This means I can quicky find photos from my library that contain insects, a family member, a location etc.
This is really useful as your library grows. Recently a photography competition was launched based on a local location, I was able to locate all the photos I had taken of this area in seconds and to be honest I had forgotten many of them.

5. Export
Exporting to MobileMe is a breeze, select the photos you want to share and click the MobileMe button along the bottom of the iPhoto interface. iPhoto offers direct share capabilities for MobileMe, Facebook and Flickr, that said I don’t really like the way iPhoto exports to Flickr.
Each export is listed along the side panel of iPhoto and although it can be handy to be able to delete from Flickr directly from iPhoto I prefer to be able to put a photo on iPhoto and forget about it.
I tend to use the export option (file, export) and export the photos I want to share on Flickr and upload these via either Flickr’s web upload interface or more recently use the brilliant Dropzone application.
To see the final version of this insect photo shared on Flickr click here. Constructive comments are always appreciated as I am complete novice photographer trying to learn.
I love iPhoto but once but as my image library grew so did the startup time. iPhoto was just taking too long to launch and import my photos and often time crashed during the process. I started using Adobe Lightroom 3 Beta and I love it. It is a true photography application designed to be a digital dark room. Lightroom 3 Beta has a plug-in architecture and I found some excellent FREE plug-ins to upload my images to flickr and facebook. LIghtroom is not cheap but when the beta expire I will seriously consider the purchase – unless Apple blows my mind with iPhoto 10.